Team Building
队伍搭配
Four characters, one on the field. A framework for choosing them, built on what the game data establishes rather than on a guessed tier order.
A Silver Palace team is four characters, one of whom is on the field at a time. That single fact is what makes team building a real decision rather than a list of the four strongest units: three of your four are contributing through their buffs, their Tactical Assault and the Reactor Attribute they bring, not through their own damage.
This guide is a framework, not a ranked list. The game has not launched, no damage numbers are public, and balance moved noticeably between the two closed betas. What follows is what the game data actually establishes, with the numbers attached, so you can make your own call rather than trust somebody else's tier order.
Quick Answer
Build around three things. Pick a damage dealer. Add at least one of the five characters who buff the team from their base kit rather than from unlocked Psyches. Share a Reactor Attribute across as many of the four as you can, because six separate Motive, Implement and Epiphany effects pay out only to teammates who match, and a single Resonance meter fills faster than two. Then accept that the Power budget lets you fully catalyse exactly two Reactors, and decide which two.
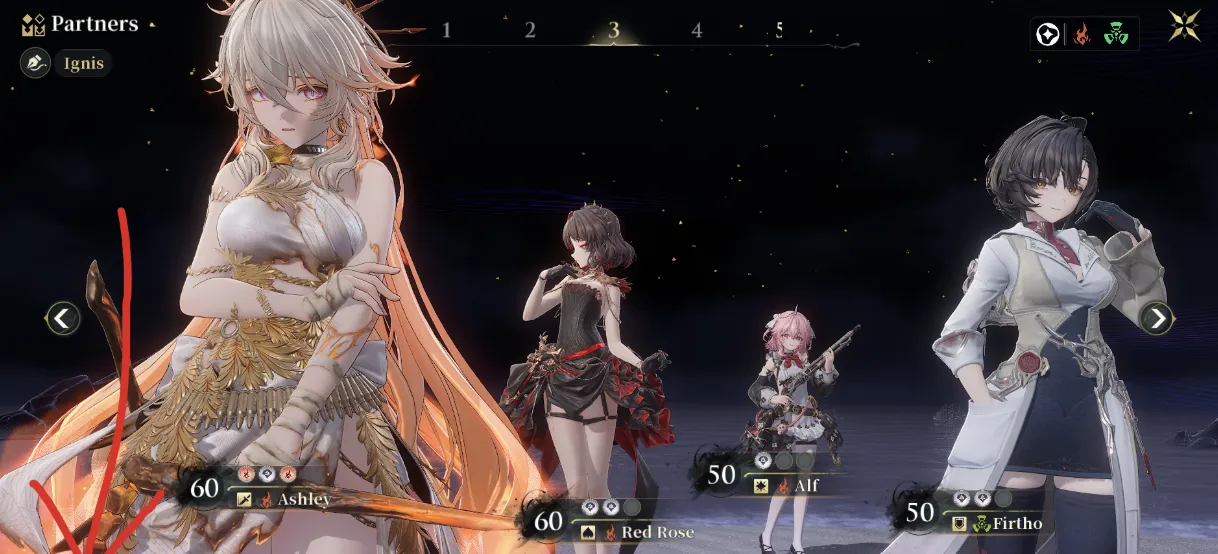
The Partners screen, where a team is assembled. The attribute filter sits top left, and each character carries their own level and role icons. Official Dichotomy beta footage.
The five Combat Styles, and what the roster actually has
Combat Style is the role filter shown on the character Details screen. The descriptions below are the in-game text.
| Combat Style | What it does | On the roster | |
|---|---|---|---|
| Striker DPS | Characters that excel at damaging enemies with skills | 3 | |
| Resonance DPS | Characters that excel at damaging enemies with Resonance Effects | 2 | |
| Break Suppressor | Characters that excel at building up Stuns | 3 | |
| Combat Support | Characters that provide powerful buffs to their allies | 5 | |
| Survival & Healing | Characters that can heal or shield their allies | 2 |
The distribution is the useful part. Survival & Healing has exactly two characters in the whole roster, Gratia and Firtho, so if you decide a fight needs sustain there is no third option and no substitute from another role. Combat Support is the deepest bench at five. For which character sits where, see the Combat Styles guide and the roster.
Base-kit support versus Psyche-gated support
Every one of the fifteen characters has at least one effect that buffs the whole team. That sounds like it makes the choice free, and it does not, because most of those effects are locked behind Psyches, the duplicate-gated upgrade track.
Only five characters buff the team from their base kit, meaning from a Skill, Passive or Ultimate you have the moment you own them:
| Character | Attribute | Role | What the base kit gives the team |
|---|---|---|---|
 Gratia Gratia |
 Glacies Glacies |
Survival & Healing | Skill grants every character a Shield worth 40% of Gratia's Max HP for 20s; Passive grants all other characters 12% ATK for 40s on a Glacies Resonance Effect |
 Firtho Firtho |
 Radiatio Radiatio |
Survival & Healing | Charged Skill drains her own HP to give the team 1.5% ATK per stack, up to 8 stacks for 40s, healing everyone over time and instantly healing all but herself |
 Argos Argos |
Glacies |
Combat Support | Passive grants every character 1000 ATK after his Ultimate, plus up to 150 more scaled off his Max HP, for 40s |
 Red Rose Red Rose |
 Ignis Ignis |
Combat Support | Passive gives the team 3% increased Ignis DMG per Rose Blooms explosion, stacking 5 times for 40s |
 Gucia Gucia |
 Alba Alba |
Combat Support | Ultimate raises the whole team's Amplitude Coefficient by 10% for 40s |
The other ten reach the team only through Psyches.  Cynthia II and
  Grimm are both tagged Combat Support but have nothing team-wide until you invest, which is worth knowing before you build a team around the role label alone.
The 40-second window is the whole rotation
Across the roster there are 31 distinct team-wide effects. 22 of them last exactly 40 seconds, and the single most common trigger is the Ultimate, at 11 of the 31. A handful of examples, all verbatim:
- Argos after his Ultimate, all characters gain 15% Glacies DMG for 40s.
- Gratia after her Ultimate, all characters gain 20% ATK for 40s.
- Red Rose after her Ultimate, all characters ignore 20% of enemies' DEF for 40s.
- Gucia after her Ultimate, all characters gain 42% Amplitude Multiplier for 40s.
- Firtho after her Ultimate, all characters gain 15% Radiatio DMG for 40s.
That shared 40-second duration is a design decision, not a coincidence. The buffs are meant to be stacked inside one window rather than maintained separately: open with your supports' Ultimates, then spend the window on your damage dealer. It also explains why Ultimate Charge Efficiency shows up everywhere in support gear: the four attribute-sharing Epiphanies below each grant a flat 25%, two Implement sets grant 15%, and two more hang their team-wide payoff on the holder clearing 150% of it. Charging Ultimates faster is what shortens the gap between windows.
The Power budget caps you at two Reactors
This is the constraint that shapes teams more than any other, and it is easy to miss because it is explained in a tutorial rather than on a character screen.
Each character can equip up to three Catalysts to their Reactor. The first costs 1 Power, the second 2, the third 4. So one fully catalysed Reactor costs 7.
The team shares a single Power limit, which rises with your Crisis Level to 3, then 7, then 14.
At the cap of 14, that is exactly two fully catalysed Reactors. A four-character team can never have more than two members running a complete Catalyst loadout, so the other two are on partial Reactors or none at all. Choosing which two get the investment is the actual team-building decision, and it usually means your on-field damage dealer plus whichever support's buffs you are building the window around.
Attribute is not a constraint here, only availability is: a Catalyst of a given attribute can go on any character as long as somebody on the team carries a Reactor of that attribute, and Omni Catalysts have no restriction at all. The Catalyst database has all 17 with their costs, and the Equipment guide covers the wider gear picture.
Sharing a Reactor Attribute
There is no elemental reaction system in Silver Palace, and no attribute counters another, so there is no defensive reason to spread your team across attributes. There is a substantial offensive reason to concentrate it.
Six things pay out only to teammates who share the holder's Reactor Attribute, and they sit in three different places, which matters because you can wear them together:
- One Motive. The Resurrection Mystery, +7% DMG at refine 1 rising to +14% at refine 5.
- One Implement set, across slots 1 to 4. City Grime Alliance, a flat +8% DMG.
- Four Epiphanies, in slot 5, so you pick exactly one of them: Frustrations of Youth (+50% CRIT DMG), The Metamorphosis (+50% Amplitude Multiplier), The Price of Safe Passage (up to +30% ATK) and The Hero's Shoulder (up to +10% attribute DMG). All four also grant the holder +25% Ultimate Charge Efficiency, so running one costs almost nothing.
The Epiphanies carry the largest numbers by a wide margin, and because they occupy the Epiphany slot rather than the four Implement slots, one of them stacks with City Grime Alliance and the Motive rather than competing with them. On top of that, a team committed to one attribute fills a single Resonance meter quickly rather than two slowly, and a filled meter is what triggers the payoff effects that several kits hang their own bonuses on. The Resonance guide lists all six bonuses and the effects that fire off a trigger.
The practical read: attribute alignment is a damage multiplier you get for free by choosing who to field, and the only cost is flexibility.
What this guide will not tell you
It will not rank teams or name a best comp, because that would not be honest yet. Ranking teams requires damage numbers the game has not published, against content that is not released, at a balance point that has already shifted once between betas. Any list of "best comps" for Silver Palace today is somebody's guess presented as data.
What can be said without numbers is which characters each attribute actually has. That is on the all characters guide: the three attribute cores, the job each member fills, and the three attributes that have no core at all.
What is above is what the game data establishes, and it is enough to build with. When numbers exist, this page will get them.