Equipment & Gear System
Fixed-stat gear, no RNG farming: Epiphany, the four gear slots, Catalysts, and how set bonuses work.
Silver Palace took a different approach to character building than most gacha action games: it drops the random-roll equipment grind entirely in favor of fixed stats. This guide covers the equipment layer itself, separate from Motives, Silver Palace's equivalent of weapons.
The Equipment Slots
Beyond a Motive, each character can equip eight more pieces: one Epiphany, a set of four gear slots, and three Catalysts slotted into their own Reactor.
| Slot | Count |
|---|---|
| Epiphany | 1 |
| Head | 1 |
| Neck | 1 |
| Secondary Weapon | 1 |
| Accessory | 1 |
| Catalyst (own Reactor, not shared gear) | 3 |
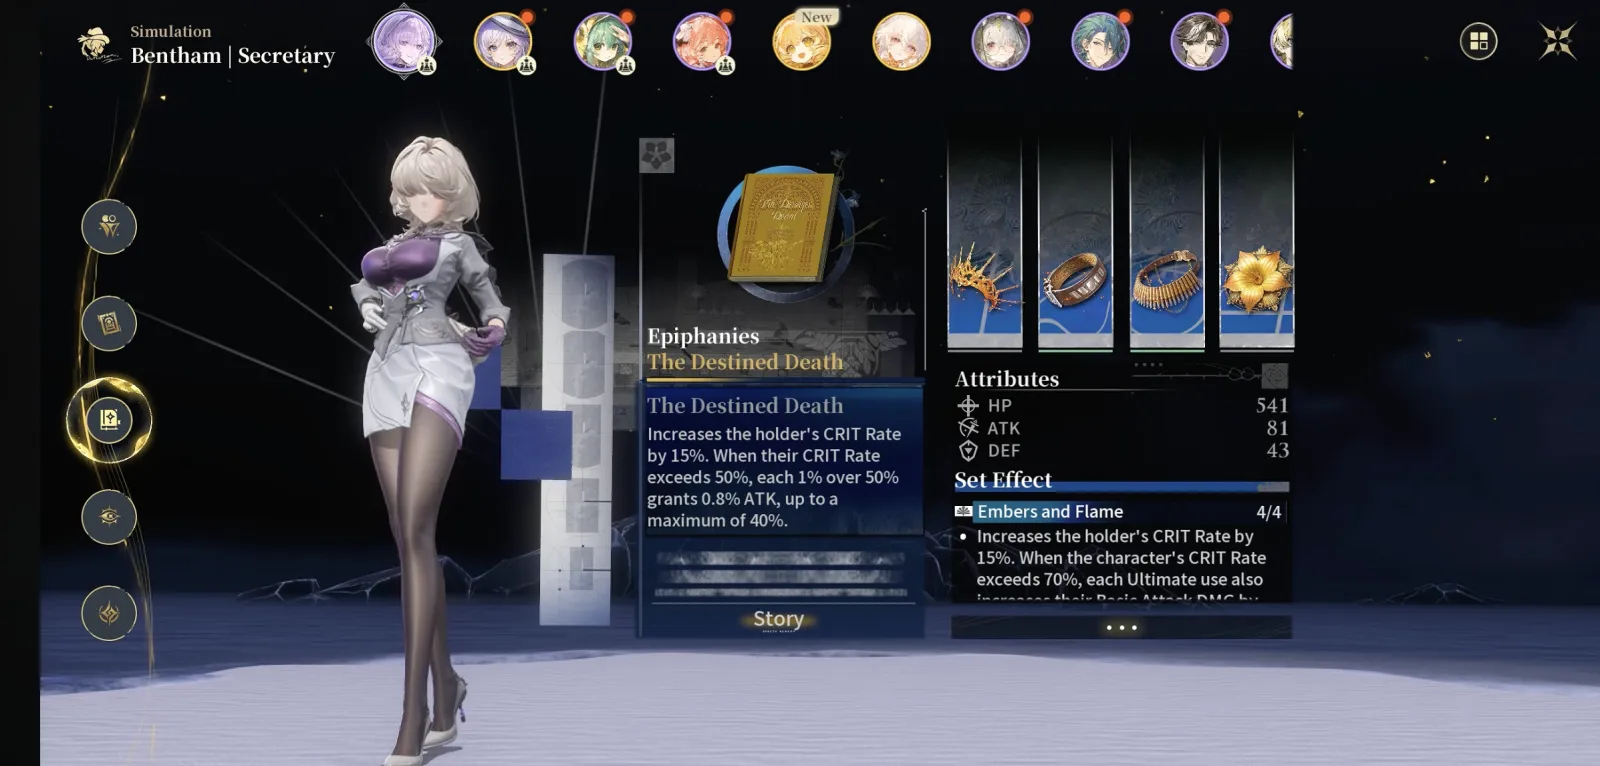
The Character Simulation screen for Bentham, showing the Epiphany slot and four gear slots together with an active set effect, from the Epiphanies guide.
Every piece in a given set and slot carries the exact same stats. There is no random substat roll to chase, so once you own a full set for a character, there is nothing left to farm for that slot beyond acquiring a duplicate of a different set entirely. The game itself labels these four gear slots "Implements," a term this guide uses from here on to match the in-game UI.
No RNG, Fixed Stats
This is the headline difference from most equipment systems: farming does not exist in the traditional sense, at least for lower-rarity gear early on. Any extra drop from a set you already have is a duplicate with identical stats to the piece you are wearing. That means there is a defined, calculable best-in-slot build for every character rather than an open-ended grind for better rolls, and your time investment goes toward acquiring the right sets rather than re-rolling the ones you already have.
Unless the game introduces an RNG layer at the endgame, expect characters to have pre-calculated, best-in-slot builds you can look up rather than optimize yourself piece by piece.
The Stats These Thresholds Are Measured In
Set bonuses and Catalysts gate on stats that other games do not have, so it is worth knowing what they actually do before you chase a threshold.
| Stat | What it does |
|---|---|
| Ultimate Charge Efficiency | Multiplies how fast your Ultimate charges. This is Silver Palace's Energy Recharge |
| Amplitude Coefficient | The chance for a Resonance Effect's damage to be multiplied. Essentially CRIT Rate, but for Resonance Effects rather than your own abilities |
| Amplitude Multiplier | The multiplier applied when that happens. Essentially CRIT DMG, but for Resonance Effects |
| Stun Buildup Bonus | Multiplies the Stun your attacks apply, so you break enemy poise faster and reach an Execution sooner |
| Break Exploit | Speeds up Defense Reduction and Resonance Accumulation. The half you can feel is the Resonance one: higher Break Exploit fills Resonance meters faster, so your Resonance Effects fire more often |
| DMG% | Damage Bonus in three flavours: Universal DMG%, Attribute DMG% such as Ignis DMG%, and ability-specific DMG% such as Basic Attack DMG% |
Amplitude Coefficient and Amplitude Multiplier are the pair worth understanding, because they only matter if your team actually triggers Resonance Effects. On a squad built around a Resonance DPS they are the two highest-leverage stats on the sheet. On a mono Striker DPS team that rarely fills a meter, they do close to nothing. Every stat here is also defined in the glossary.
Conditional Set Bonuses
Most sets grant a bonus once you cross a stat threshold, on top of their base stats. A set might grant bonus Basic Attack damage after using your Ultimate once your Crit Rate reaches a high enough percentage, or grant bonus Stun buildup after a charge attack once your Break Exploit stat crosses its own threshold. Because the base stats are fixed, hitting these thresholds is a matter of choosing the right combination of sets and Epiphany rather than hoping for favorable rolls.
Catalysts
Beyond the Epiphany and four gear slots, each character carries a third equip layer: their own Reactor, which holds three Catalyst slots. Catalysts are not part of the shared gear loadout above, they are attached to the character directly and trigger whenever that character launches a Tactical Assault. The Catalyst database lists all 17 with their full effect text.
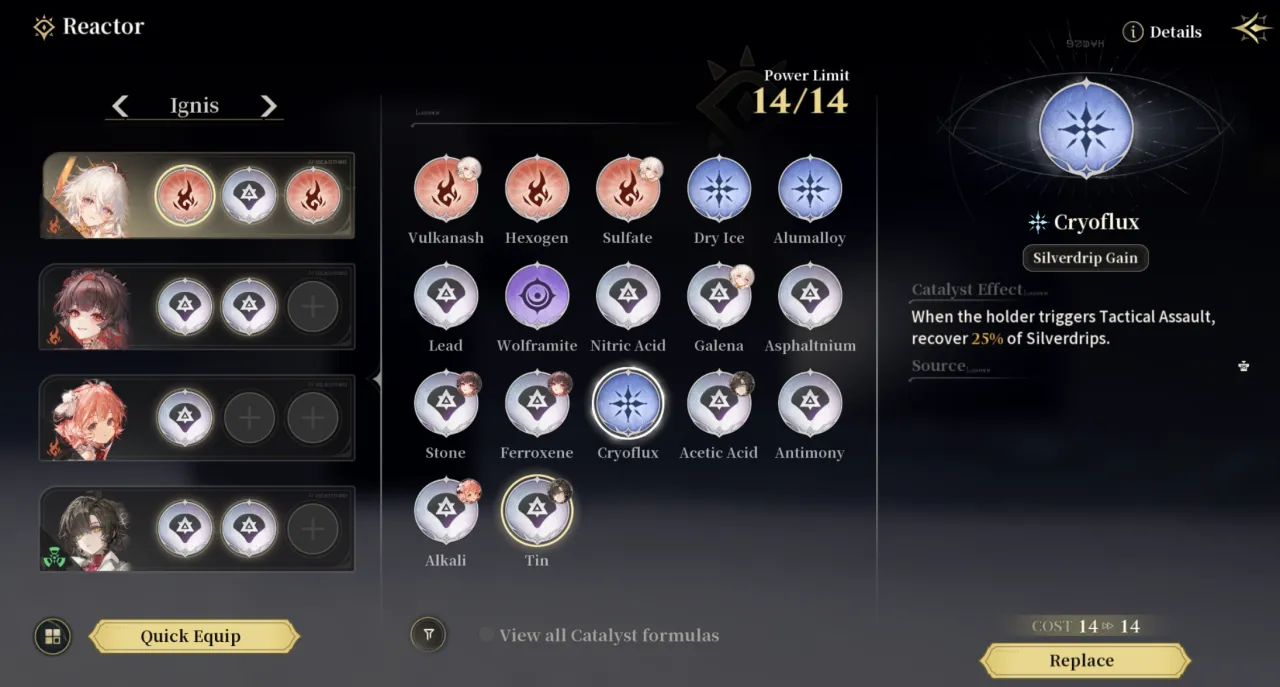
The Reactor equip screen, showing each squad member's three Catalyst slots and the Power Limit budget that caps how many can be slotted at once.
| Type | What It Does | Examples |
|---|---|---|
| Offense | Increases incoming character's attack damage during Tactical Assault | ATK boost, Crit rate increase |
| Support | Provides party-wide buffs or healing when Tactical Assault triggers | Teamwide heal, Shield boost |
| Defense Shred | Reduces enemy defenses during Tactical Assault, increasing all subsequent damage | DEF reduction, Attribute RES down |
| Attribute | Deals additional Reactor Attribute damage matching the wearer | Ignis fire damage, Glacies ice damage |
Filling all three Catalyst slots on a character maximizes their Tactical Assault power, and mixing offense, support, and defense shred Catalysts across your roster covers more of your team's needs than stacking one type on everyone. For the full mechanic (how Reactor Energy fills, how Tactical Assault works, and how Catalyst triggers fit into the combat loop), see the Reactor Energy & Tactical Assault guide.
Catalysts also carry a Reactor Attribute factor that needs to match the character wearing them to pull its weight. Vulkanash, for example, is an Ignis-attuned Catalyst built for fire characters like Cinderella; slotted onto a character with a different Reactor Attribute, it does next to nothing. Matching a Catalyst's Reactor Attribute to its wearer is a baseline check before weighing which of the four types (offense, support, defense shred, attribute) actually fits your team.
Catalyst Power Limit
Each character's Reactor loadout is capped by a Power Limit, a shared budget rather than a flat slot count. Every Catalyst carries a Cost tied to its rarity, and the combined Cost of everything you slot cannot exceed the Power Limit. At a Power Limit of 14, one strong Catalyst can eat most of your available budget on its own, while lower-rarity Catalysts leave room to fill out the other two slots. Each character can technically hold three Catalysts, but they will not all fit if their combined Cost runs over, so budgeting and distributing Cost across the team is a real optimisation decision rather than a formality.
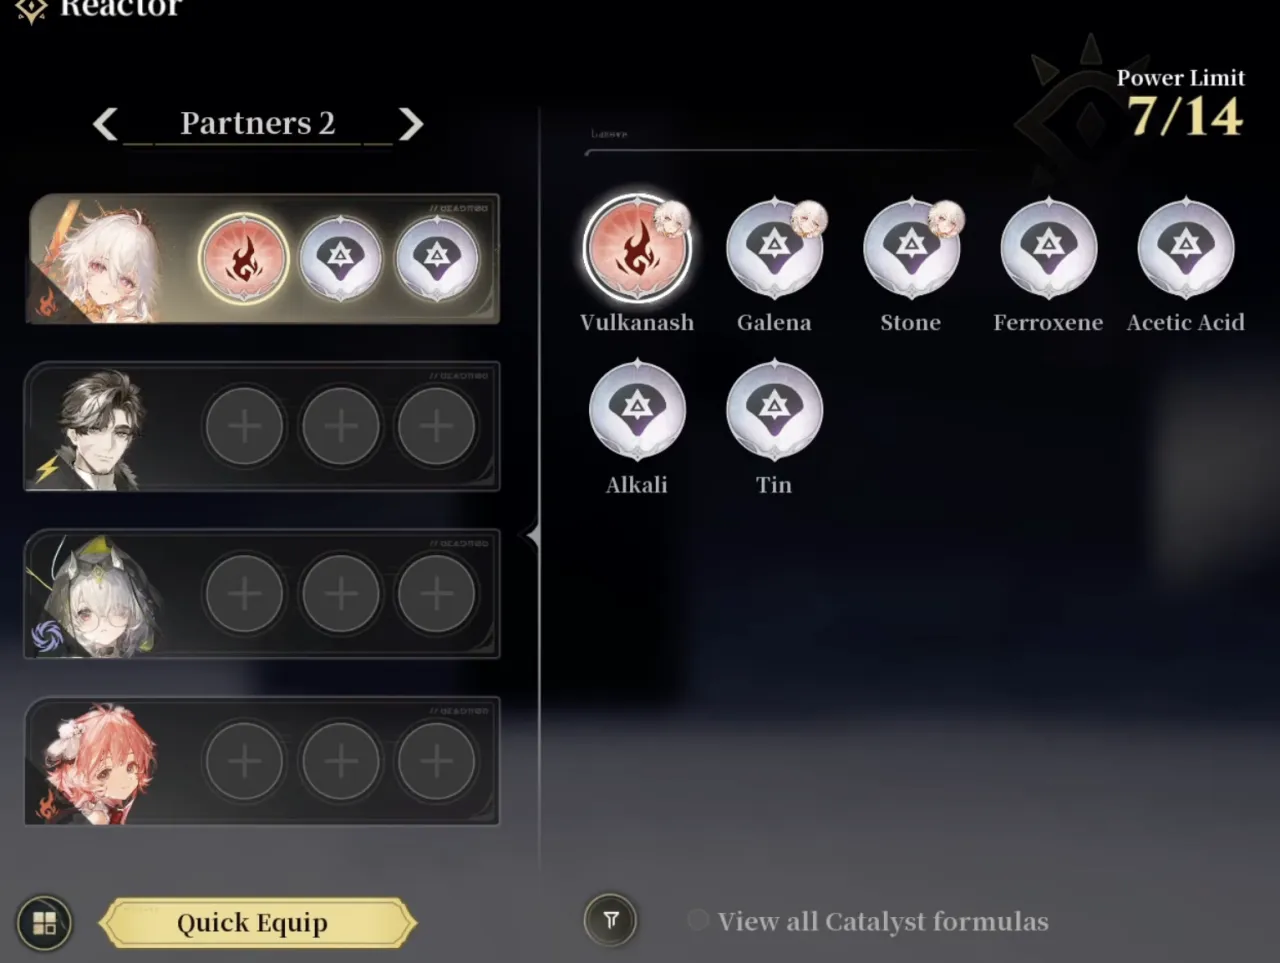
Power Limit at 7 of 14 with Vulkanash equipped.
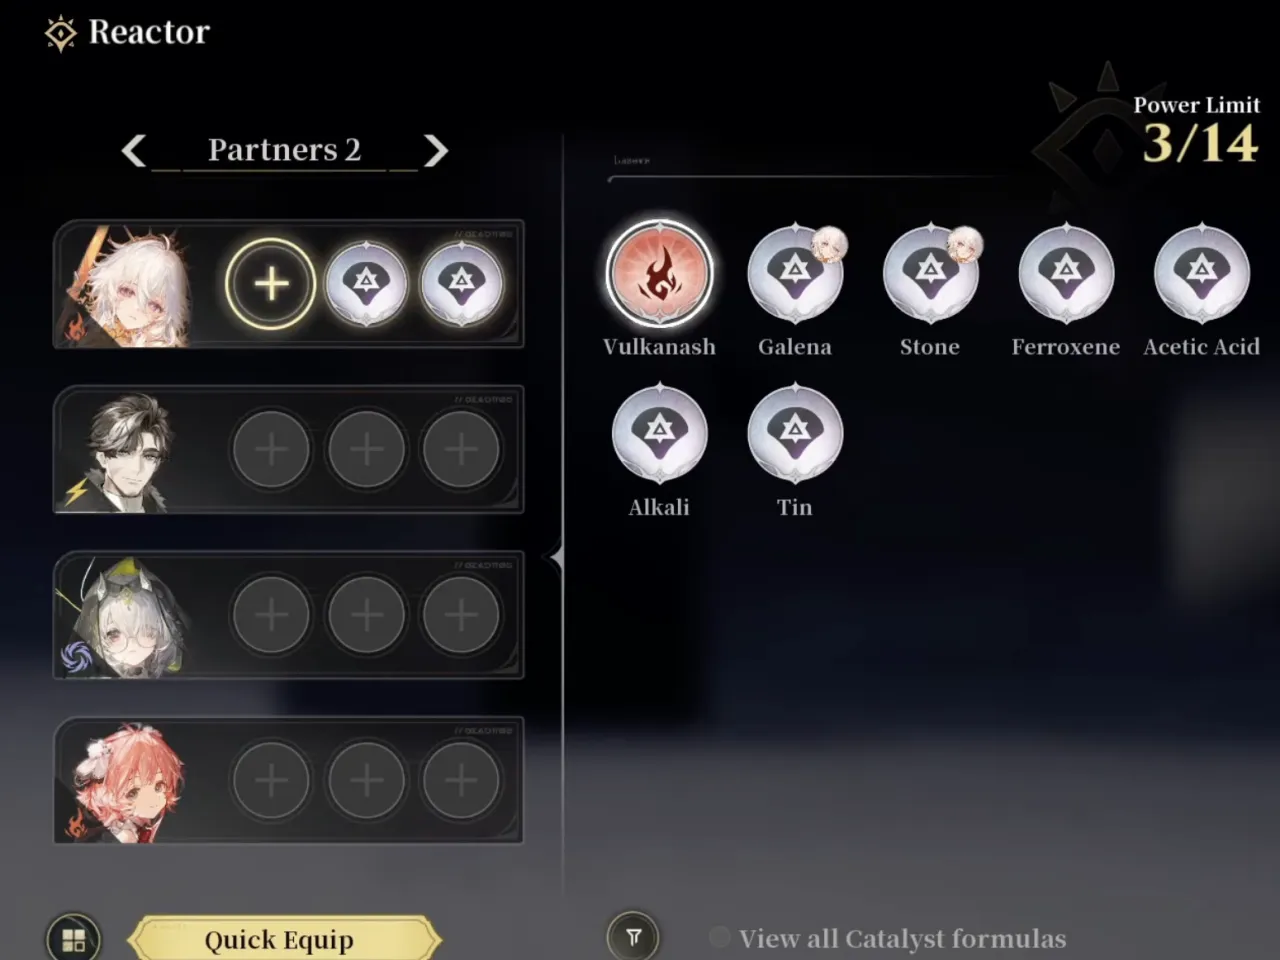
Power Limit drops to 3 of 14 once Vulkanash is removed, showing it cost 4 Power.
Unslotting a Catalyst refunds its Power immediately, so trying out a stronger option is reversible: removing Vulkanash from the loadout above drops the used Power from 7 of 14 down to 3 of 14, confirming it cost 4. Plan your three Catalysts around the total Power Limit rather than picking the strongest one for each slot in isolation.
Your total Power Limit itself rises with progression, and filling a Reactor follows a fixed escalation on top of the rarity cost: the first Catalyst you slot onto a character costs 1 Power, the second costs 2 more for a running total of 3, and the third costs 4 more for a running total of 7. A single fully-loaded Reactor lands neatly at half of the 14-point budget shown above, leaving room to spread the rest across the other Catalysts on your team. You raise your overall Power Limit through story progression and by beating Perilous Personages around the city, so a bigger budget arrives naturally as you clear more content rather than needing a separate grind.
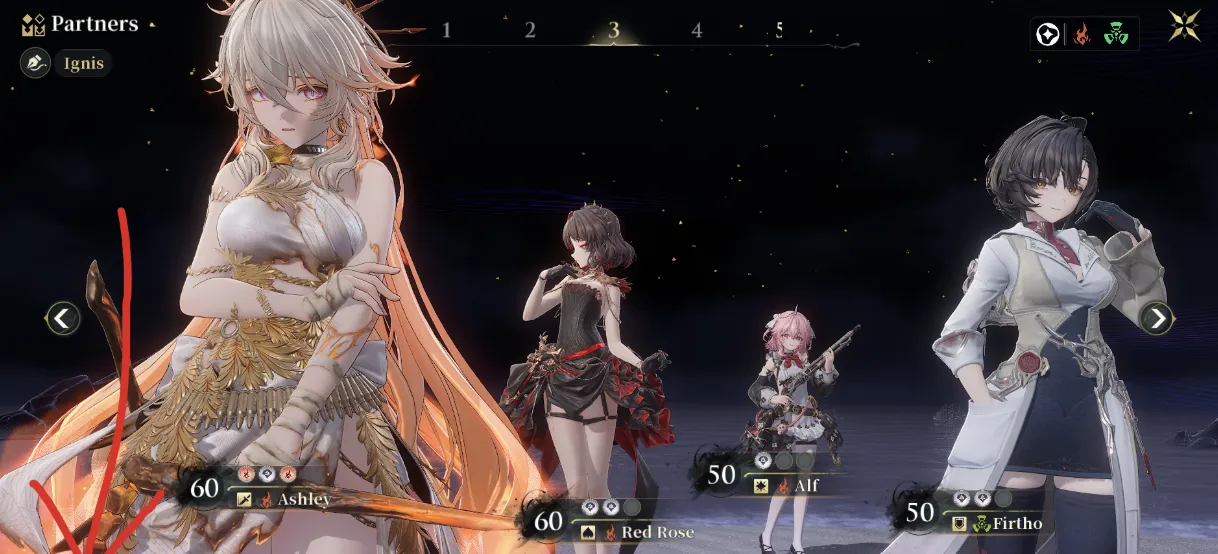
An example team roster. Each character in the lineup carries their own Reactor, drawing from the shared Power Limit above.
Acquiring Catalysts
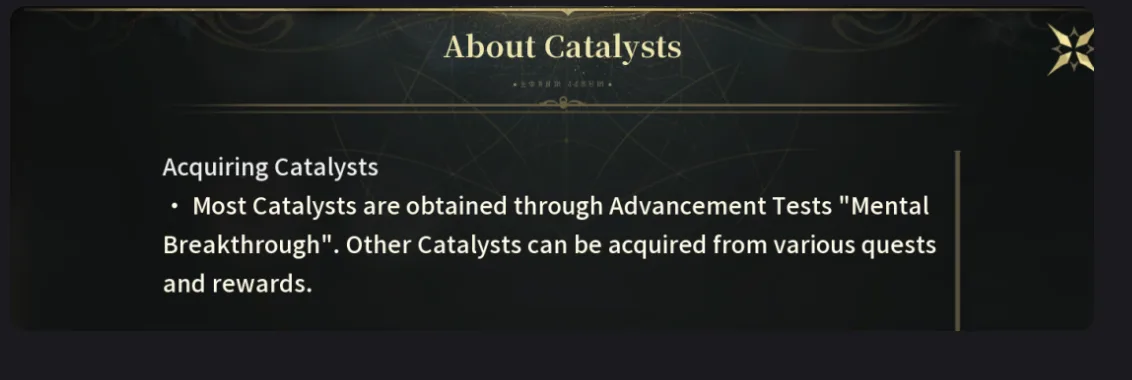
The in-game About Catalysts info card.
Most Catalysts come from Advancement Tests, labeled in-game as "Mental Breakthrough." The rest come from quests, exploration, elite (Adversary) enemy drops, and puzzle rewards, so building up a Catalyst collection happens naturally by playing through content rather than needing a dedicated farming loop.
Implements
Implements is the official name for the four-piece gear system covered above (Head, Neck, Secondary Weapon, Accessory), also called an attribute set. They are Silver Palace's answer to Artifacts in Genshin: you run a set of four for a set bonus. The difference is that Implement stats are fixed. Note that Secondary Weapon here is an Implement slot and has nothing to do with Motives, which are the separate weapon-equivalent layer. They carry a rarity ladder from grey up through green, blue, and purple, with a yellow tier that exists in the game's data but is not yet obtainable. Every piece, set bonus and stat line is listed in the Implement database, with the numbers at each rarity and level.
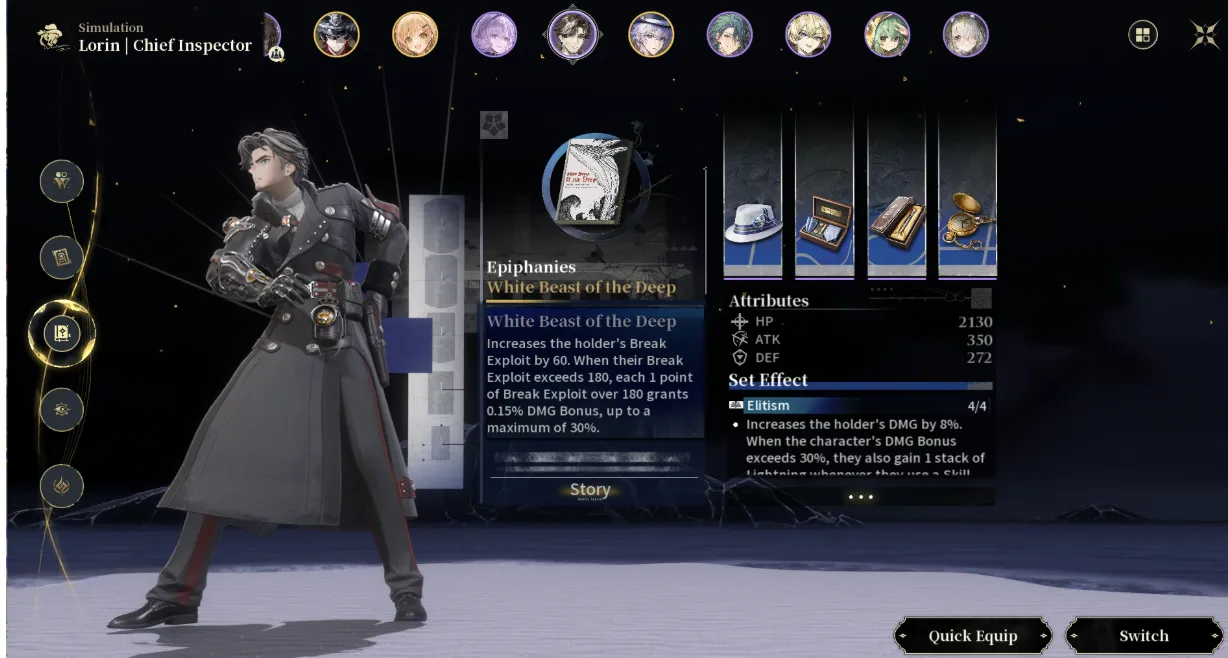
Lorin's Character Simulation screen, showing the White Beast of the Deep Epiphany alongside a full four-piece Elitism Implement set.
An Implement is always at its maximum possible level the moment you acquire it, so there is no leveling grind and no materials to feed into it. The in-game UI labels the stat lines on a piece substats, but they do not roll. Every copy of the same piece at the same rarity and level carries identical values, and rarity changes only how strong those fixed values are. The rollable substats in Silver Palace live on your one Epiphany instead. A green-rarity level 60 "Death Is Now the Phoenix' Nest" carries an ATK% of roughly 3.09% and a DMG Bonus of roughly 1.93%, while the purple-rarity level 60 version of the exact same piece pushes those same two substats up to 6.18% and 3.86%.
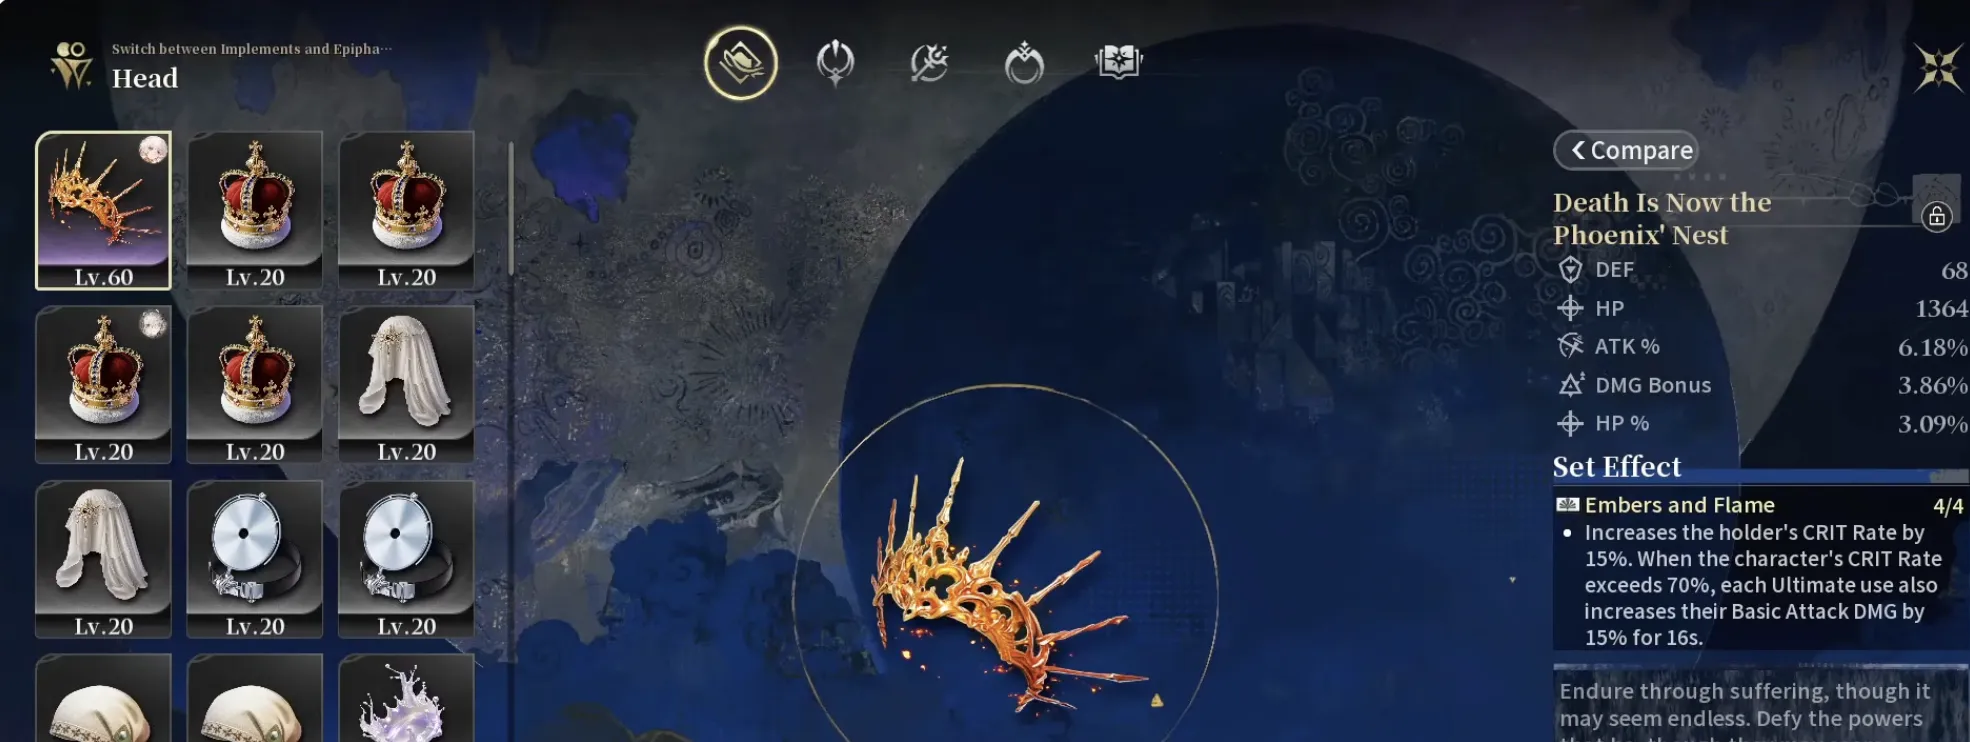
Death Is Now the Phoenix' Nest at purple rarity, level 60, contributing to a full four-piece Embers and Flame set effect.
Both Epiphanies and Implements share the same equip rule as everything else on this page: your character's own level needs to match or exceed the level of the piece before you can equip it.
Which set for which character
Because the stats are fixed, the set is the whole decision, and it is one you make once per character rather than re-rolling toward. Here is the current answer for every character on the roster, with the reasoning on each character's own page.
| Character | Reactor Attribute | Combat Style | Best set |
|---|---|---|---|
| Hugin | Gravitas | Striker DPS | Embers and Flame |
| "Cinderella" | Ignis | Striker DPS | Embers and Flame |
| Argos | Glacies | Combat Support | Retainer's Code |
| Alf | Ignis | Break Suppressor | Elitism |
| Lorin | Fulmen | Break Suppressor | Hey, Jack |
| Firtho | Radiatio | Survival & Healing | Hippocratic Oath |
| Cynthia II | Alba | Combat Support | Queen's Divine Right |
| Rex | Fulmen | Resonance DPS | To Serve and Protect |
| Red Rose | Ignis | Combat Support | The Pre-Argent Light |
| Gucia | Alba | Combat Support | Illusion of Life |
| Captain Kaboom | Radiatio | Break Suppressor | Cogs of the City |
| Grimm | Fulmen | Combat Support | City Grime Alliance |
| Bentham | Glacies | Resonance DPS | To Serve and Protect |
| Gratia | Glacies | Survival & Healing | Retainer's Code |
| Munin | Gravitas | Striker DPS | Embers and Flame |
The pattern behind the table is worth naming. Quick-swap supports want Ultimate Charge Efficiency, because their contribution is an Ultimate and the sooner it comes back the more often they deliver it. Resonance DPS carries want Amplitude Coefficient and Amplitude Multiplier, which are crit rate and crit damage for Resonance Effects rather than for abilities. Striker DPS carries want ordinary CRIT Rate and ATK. Break Suppressors want Break Exploit and Stun Buildup Bonus. Match the stat to the job and most of the sets narrow to one or two candidates on their own.
Epiphanies
An Epiphany is a book that slots into the Epiphany slot covered above, and it comes at level 20, 40, or 60 depending on which title you have, with Lv.70 copies also showing up in the beta build. Each Epiphany carries its own fixed set of substats plus a unique effect tied to a specific character or title, so the level and the title both matter. For the effect text of every individual book, see the full Epiphany list with all 30 effects.
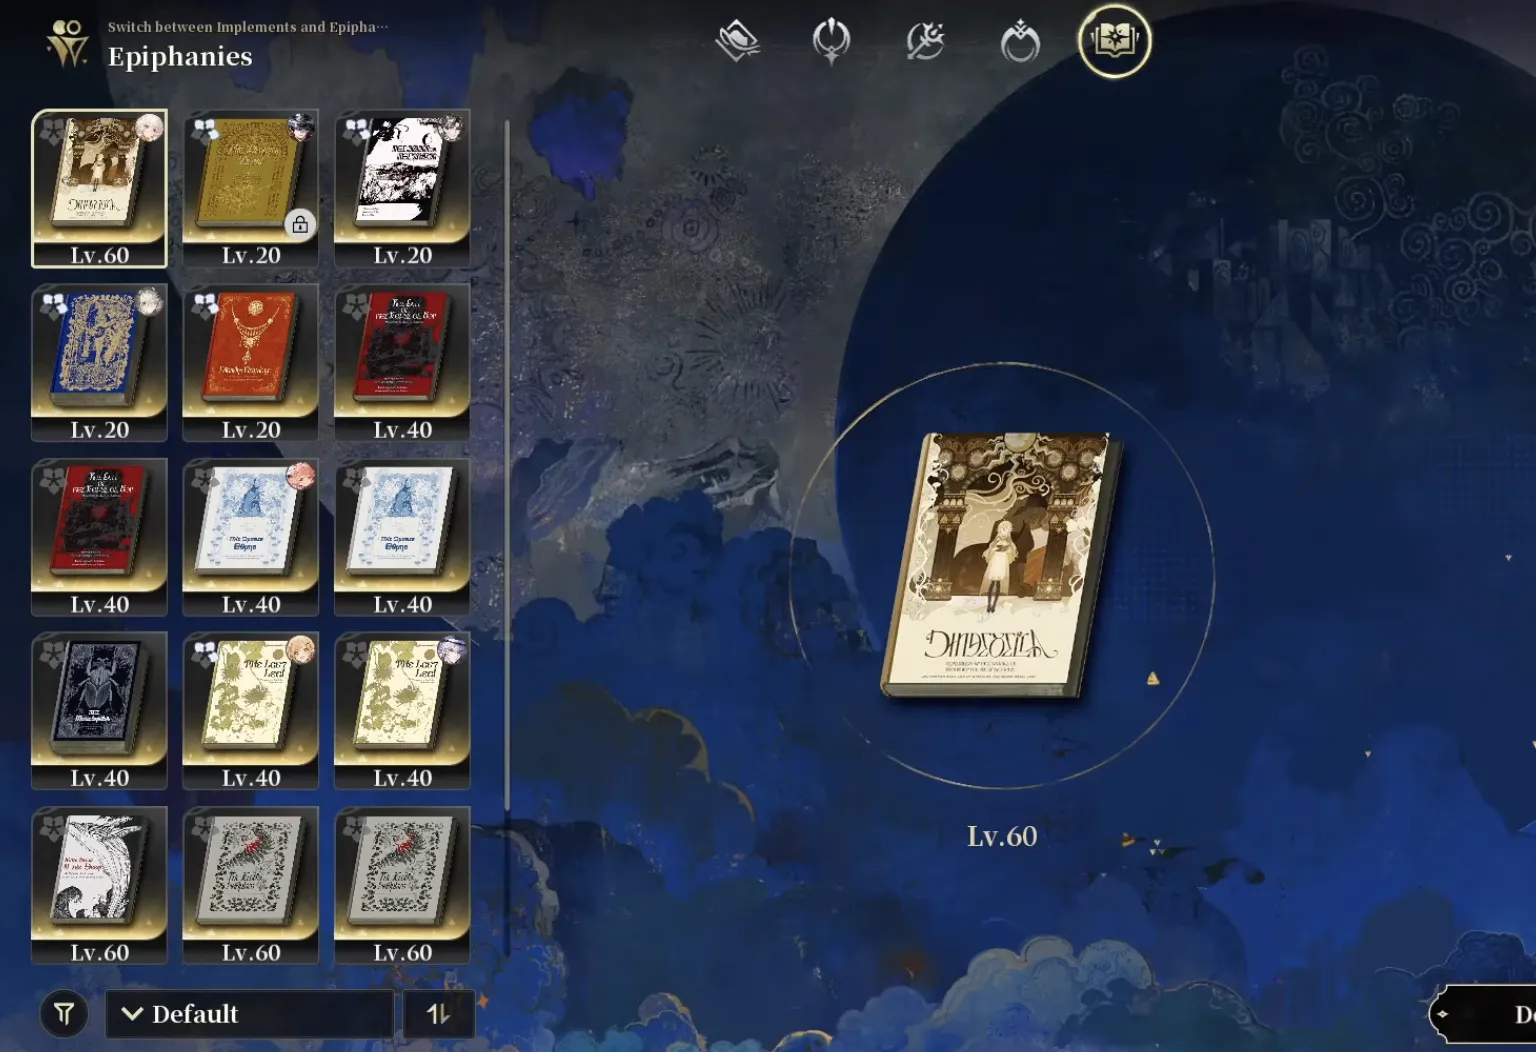
A collection of owned Epiphanies at their various levels.
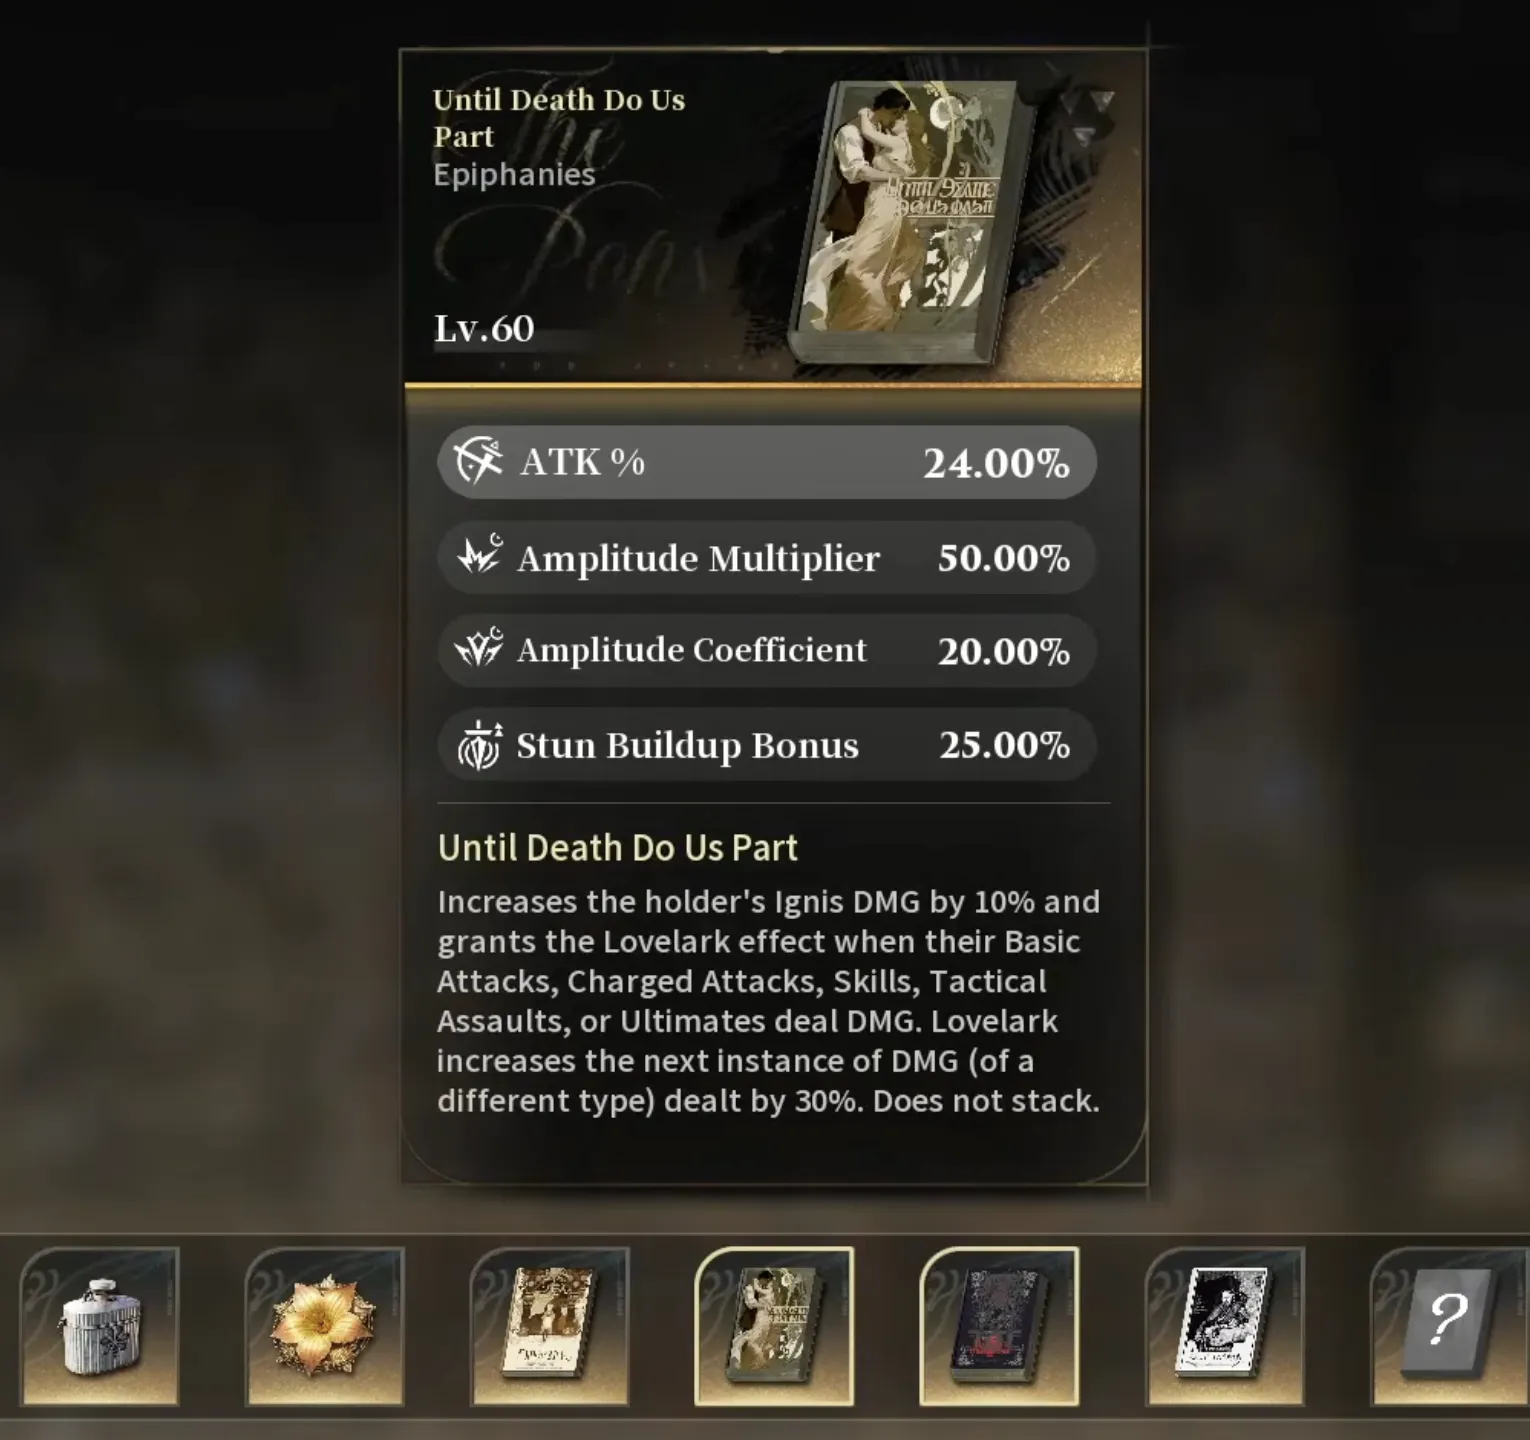
Until Death Do Us Part at level 60: ATK% 24%, Amplitude Multiplier 50%, Amplitude Coefficient 20%, and Stun Buildup Bonus 25%, alongside its Ignis DMG and Lovelark effect text.
The only way to raise an Epiphany's substats is by feeding in duplicate copies of that same title. Each duplicate randomly upgrades one substat, and you can keep feeding in dupes until every substat on the Epiphany is maxed, so there are no wasted rolls, only a longer grind for more copies.
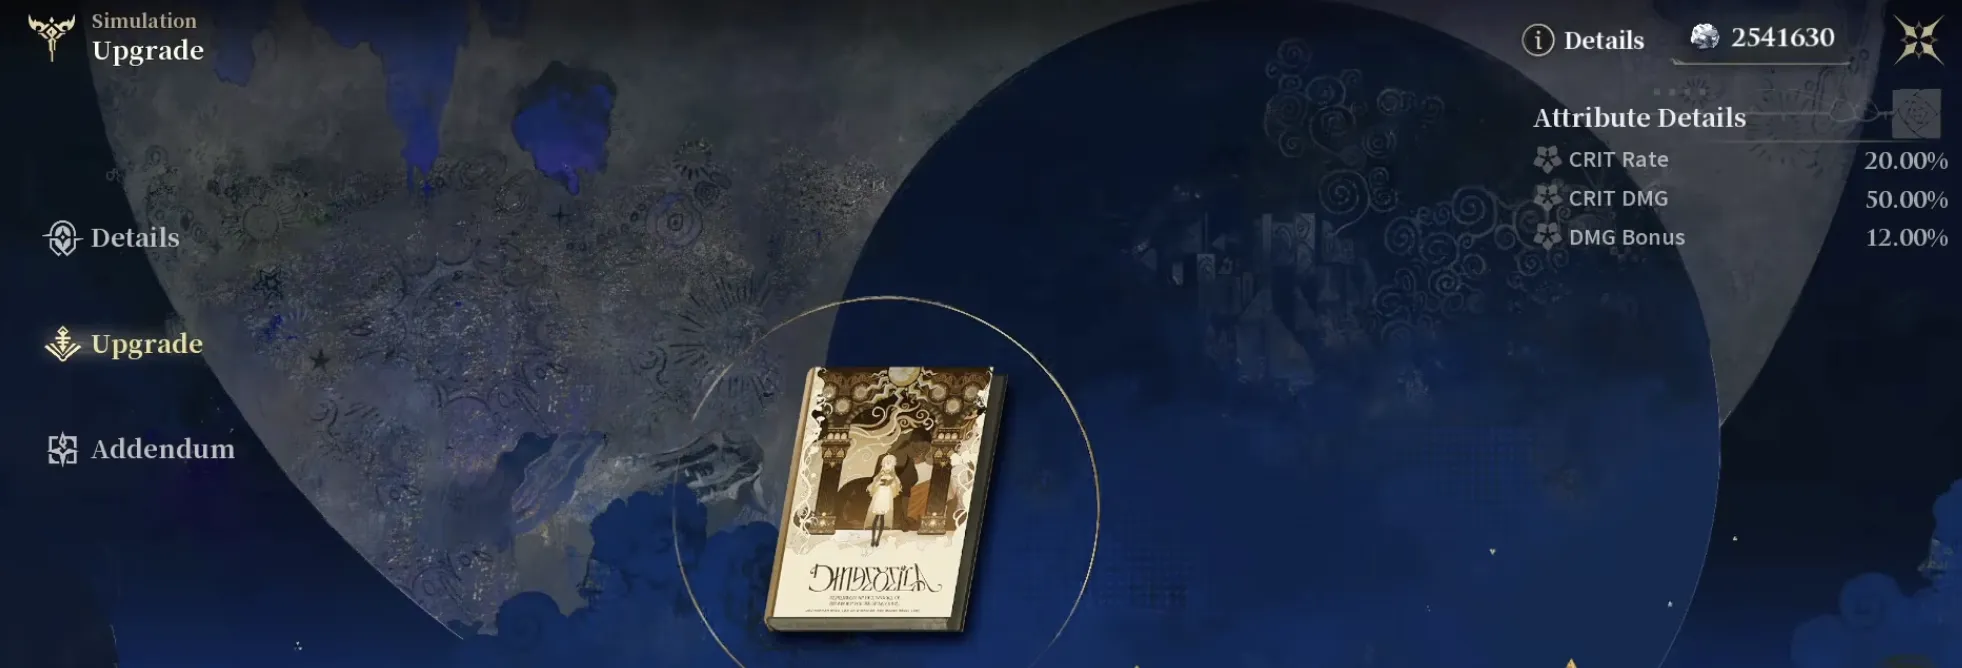
The Upgrade tab, with a flower icon marking each substat that duplicates can raise.
Epiphanies also have a separate upgrade track called Addendum, which adds an extra passive skill effect on top of the book's own stats. One Sketch Ink gets you a random Addendum, while one Custom Ink plus one Sketch Ink together gets you a Targeted Addendum tied to a specific character. Re-rolling an Addendum lets you compare the previous result against the new roll and keep whichever one you prefer.
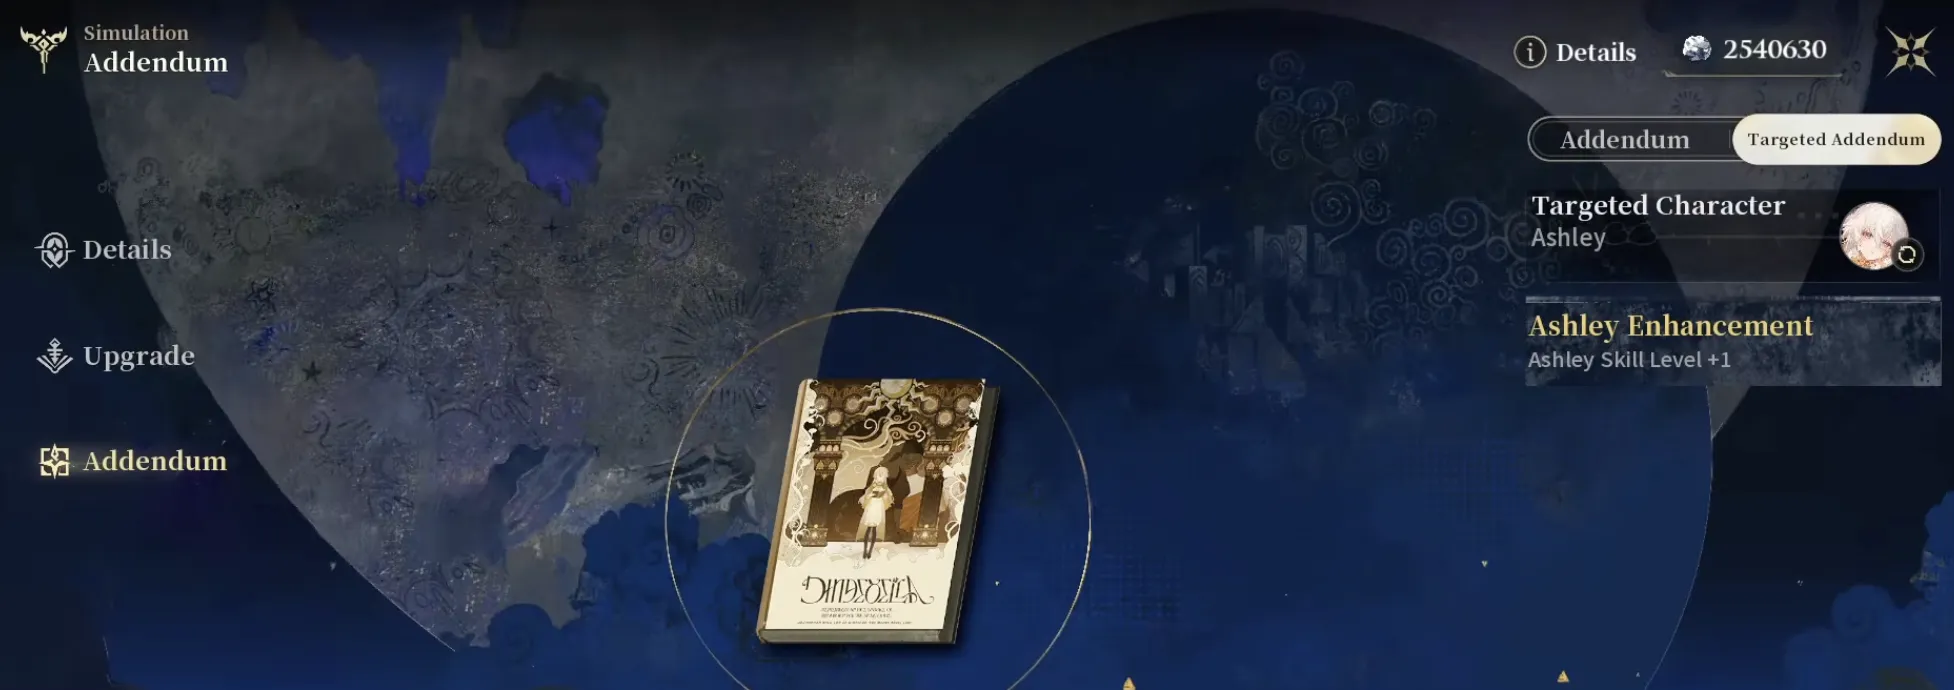
A Targeted Addendum on Ashley, currently granting Ashley Skill Level +1.
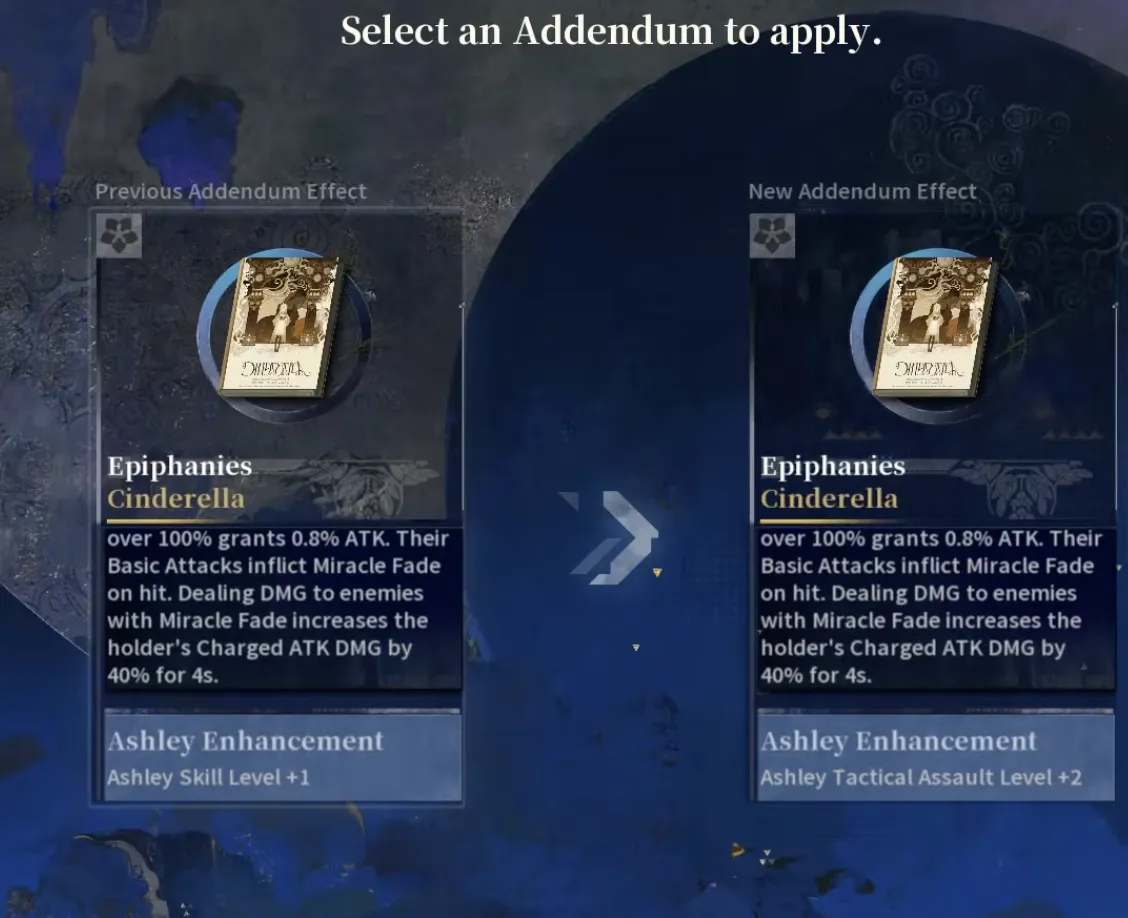
Rewriting an Addendum lets you compare the previous effect against the new roll before choosing which to keep.
Epiphanies come from two main sources. Boss encounters around the map, like Wolf King's Hunt at Felix, Morgue Street, High Peers, have a chance to drop specific Epiphany titles tied to that fight. Clearing Hilbert's Hotel, unlocked through story progress, earns you Fate Clippings, torn parts of Epiphanies you get by salvaging Epiphanies you do not want, which you spend 1,000 at a time at the Argent Docks Epiphany Archive to buy any title outright rather than relying on a drop chance.

Wolf King's Hunt, one of the map's boss encounters with a chance to drop specific Epiphanies.
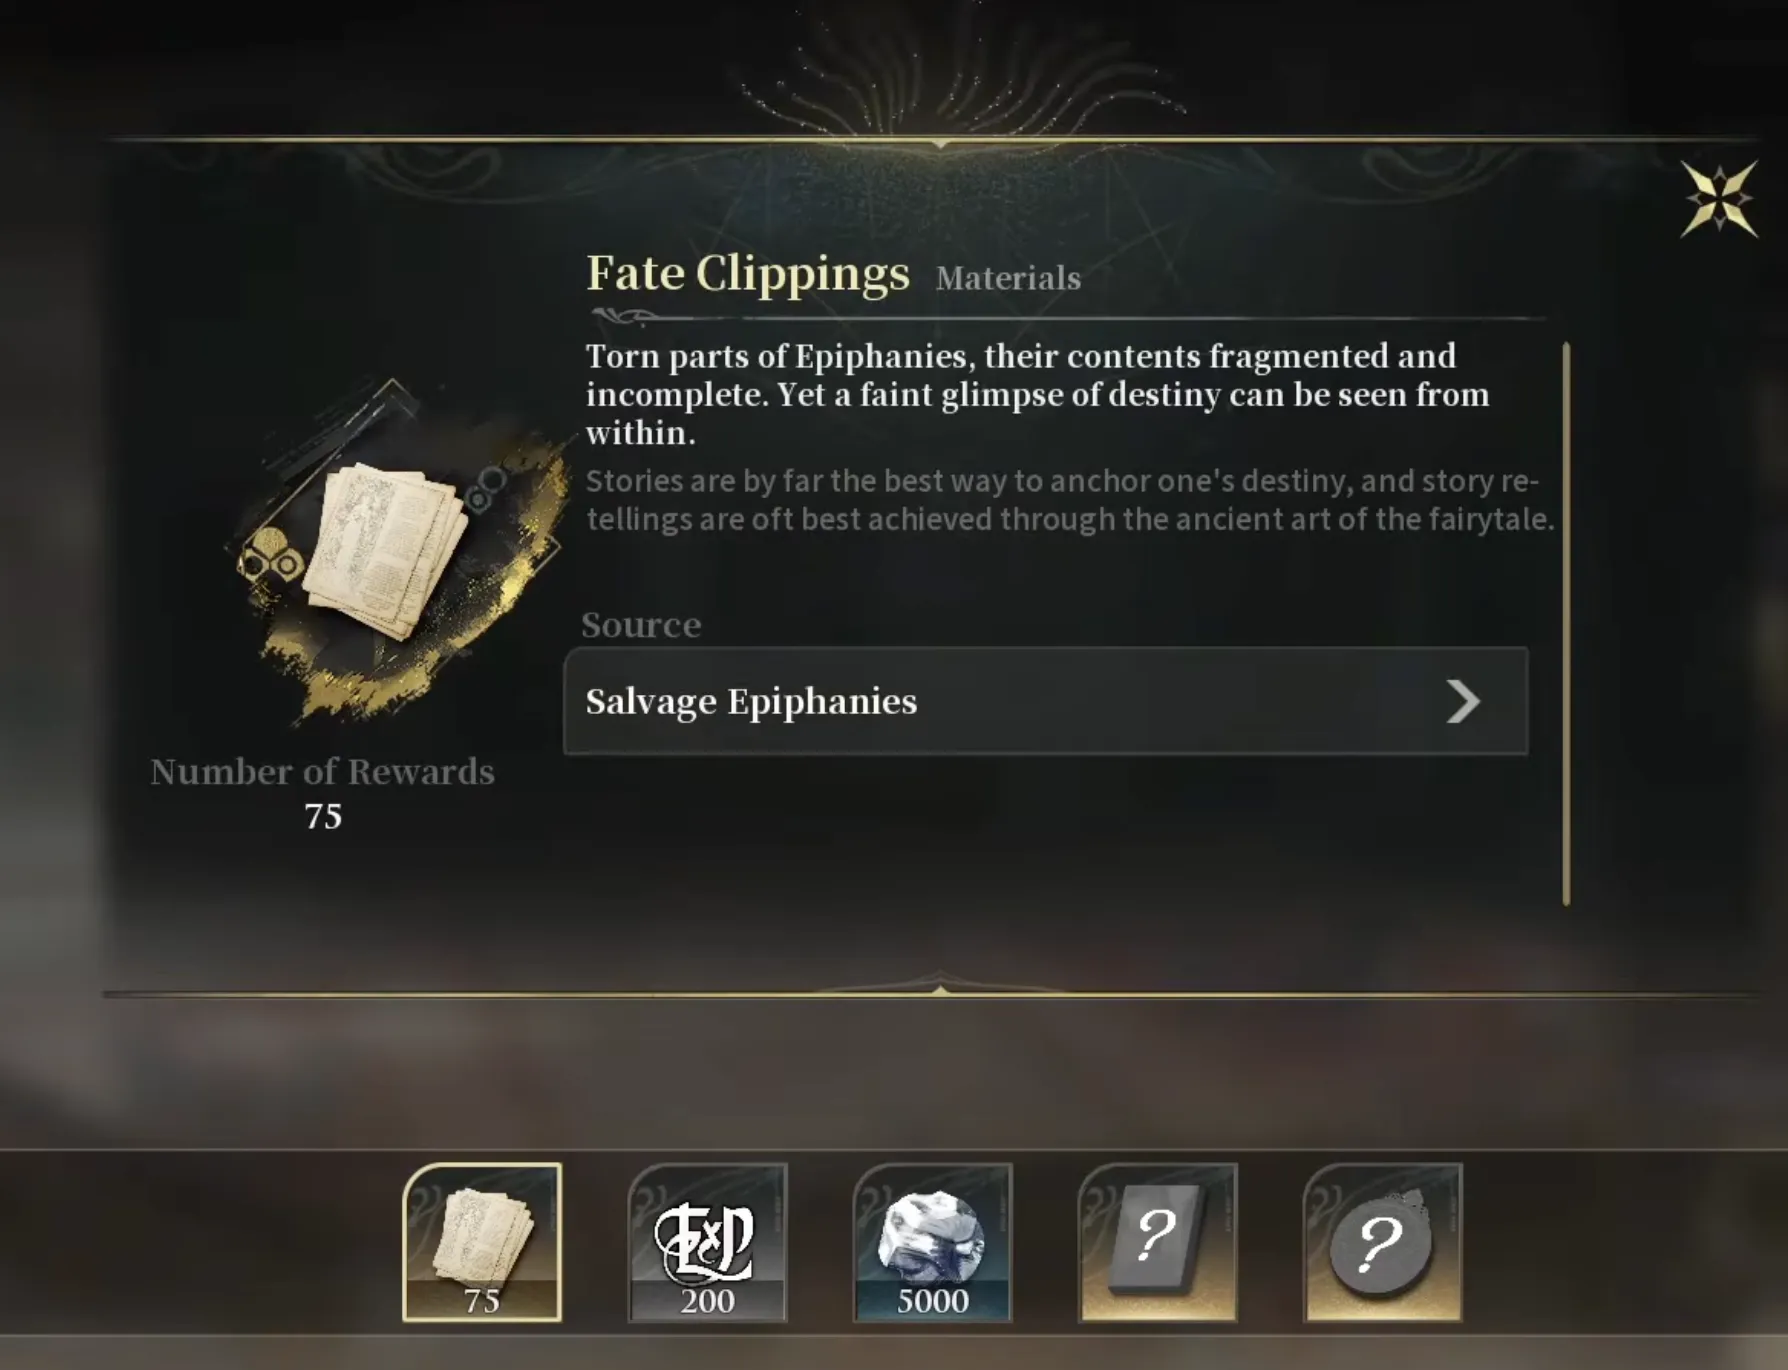
Fate Clippings, earned by salvaging Epiphanies you do not want.
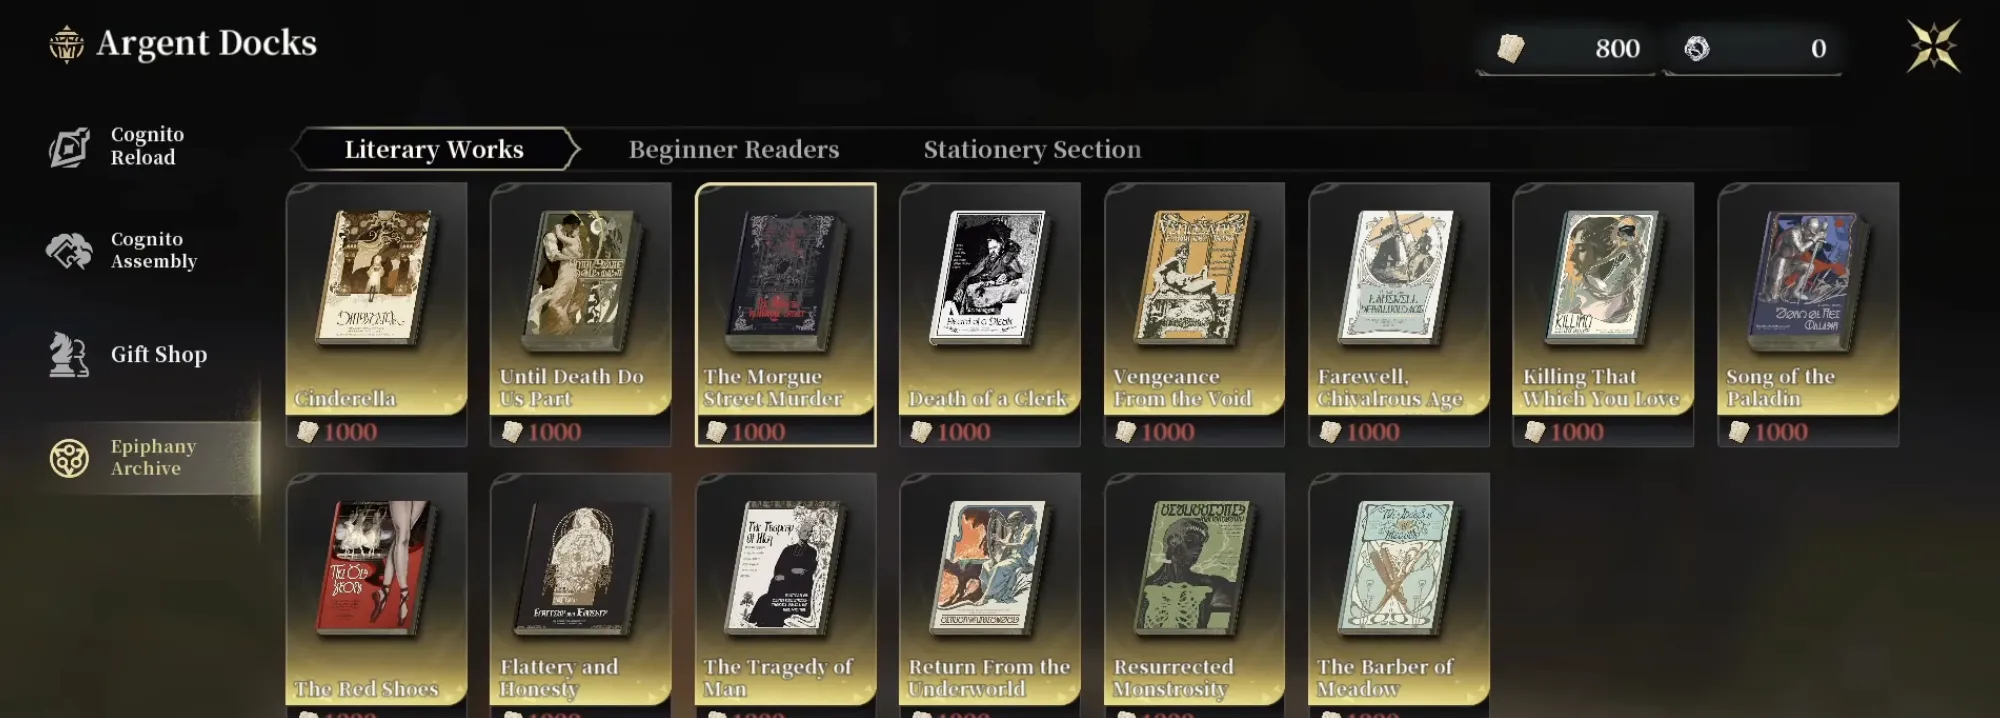
The Argent Docks Epiphany Archive, where any listed Epiphany title costs 1,000 Fate Clippings.
Custom Ink and Sketch Ink for the Addendum system are bought separately in the Stationery Section, at 3,000 and 600 Surplus Materials. The Argent Docks shop guide lists every tab and price in that shop.
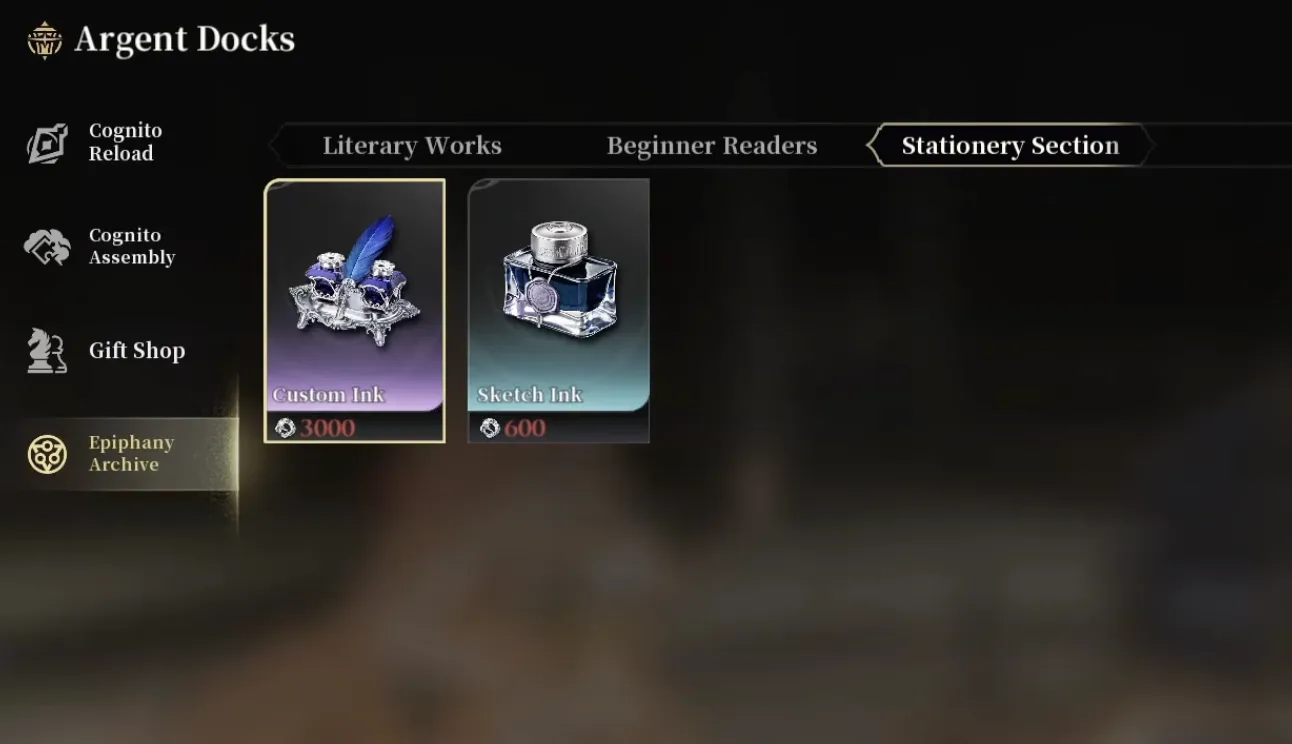
Custom Ink and Sketch Ink, sold in the Argent Docks Stationery Section.
Implements, Motives, and Catalysts
New players often conflate these three equip systems, so it is worth separating them clearly. Motives are Silver Palace's equivalent of weapons, carrying their own stats and set bonuses. Implements, the Epiphany plus four fixed-stat slots covered above, are a separate stat layer on top of that. Catalysts sit apart from both: they slot into a character's own Reactor rather than a shared loadout, and they control Tactical Assault behavior instead of adding passive stats. All three matter for an optimized build, and none of them substitutes for another.
Motives: Amplify and Resonate
Every character has a matching Motive, though a handful of extras exist you can use in a pinch if you have not pulled the exact one. A Motive's Identity category is what determines whether it grants a character a passive effect on top of its stats, so matching Identity to character is worth checking before you commit materials to upgrading one.
Amplify raises a Motive's level using bookmarks, or by consuming other unlocked Motives as material. The screen below shows a Motive going from level 40 to 42 through Amplify, with HP rising from 1890 to 1940 and ATK from 243 to 249.
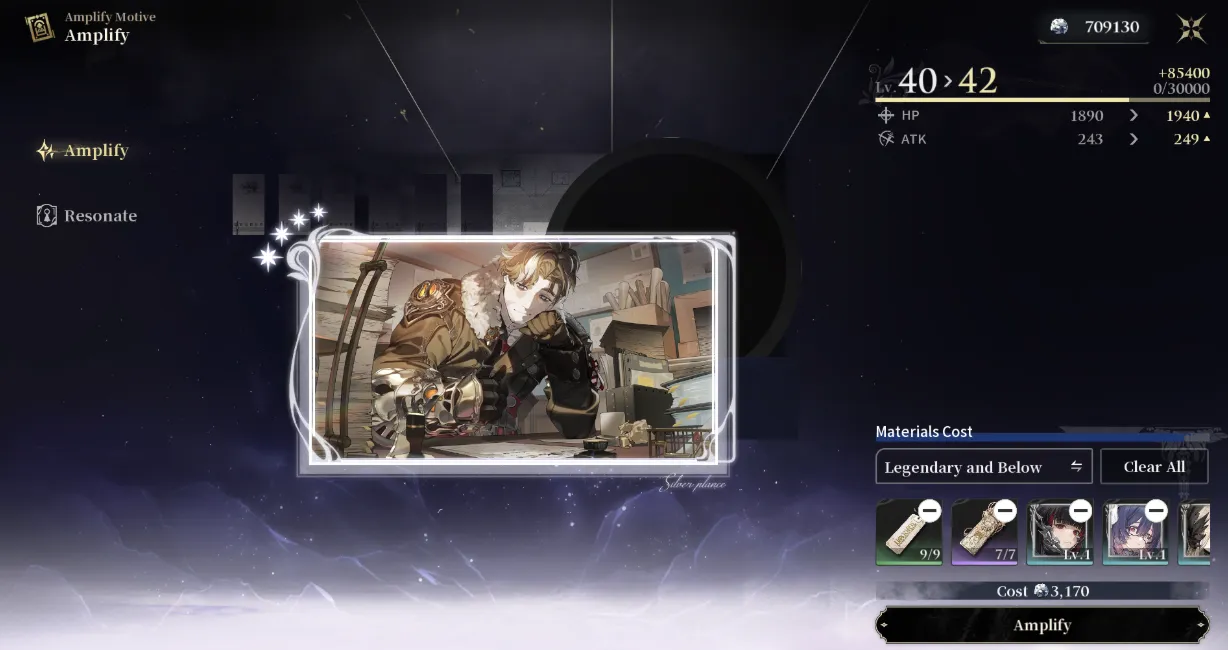
Amplifying a Motive from level 40 to 42, with the resulting HP and ATK gains shown on the right.
Duplicate copies of a Motive are not wasted. Resonate lets you merge a duplicate into the Motive you already have equipped, raising it from Resonance 1 up to Resonance 5 and strengthening the effect tied to that Motive. The example below shows The Formalism Mystery at Resonance 5, granting 20% ATK and boosting its wearer's Stun Buildup Bonus by 84% for 15 seconds after a Tactical Assault, up from 17.5% ATK and 73.5% Stun Buildup Bonus before the upgrade.
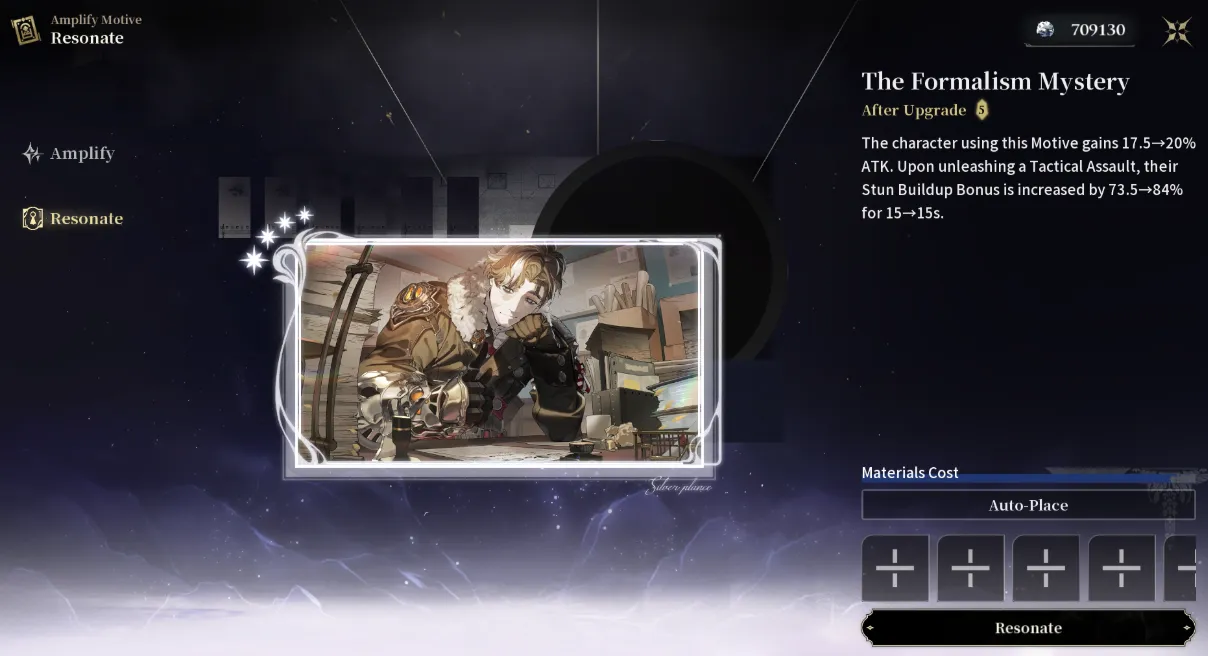
The Formalism Mystery at Resonance 5, showing the stat and effect boost gained over its base Resonance and the materials needed for the upgrade.
As with everything else on this page, a character needs to be at or above a Motive's level to equip it, so Amplifying is often the difference between a Motive sitting in your inventory and it actually pulling its weight in your active loadout.
Frequently Asked Questions
What equipment can characters use in Silver Palace?
Each character can equip an Epiphany plus four gear pieces (Head, Neck, Secondary Weapon, Accessory), and separately, three Catalysts slotted into their own Reactor. This is all separate from Motives, Silver Palace's equivalent of weapons.
Is Silver Palace gear RNG-based?
No. Gear uses fixed stats rather than random rolls. Every set piece in a given slot has the same stats, so duplicate drops from the same set are identical rather than a chance at a better roll.
How do gear set bonuses work?
Sets grant conditional bonuses once you cross a stat threshold. For example, reaching a high enough Crit Rate can unlock bonus Basic Attack damage after using your Ultimate, or reaching a Break Exploit threshold can unlock bonus Stun buildup after a charge attack.
What is a Catalyst and how is it different from gear?
A Catalyst is an item slotted into a character's own Reactor (three slots per character) rather than the shared gear loadout. Catalysts control what happens when that character triggers a Tactical Assault: offense, support, defense shred, or Reactor Attribute damage. Gear instead adds passive fixed stats, so the two systems stack rather than compete.
What is the difference between Motives and gear?
Motives are Silver Palace's equivalent of weapons with stats and set bonuses. Gear (Epiphany plus the four fixed-stat slots) is a separate, additional layer of stat investment on top of your Motive.
Because there is no roll-chasing involved, the equipment layer rewards planning over grinding: figure out which sets and Epiphany combination hits your character's thresholds, acquire them once, and move on. From here, the Combat Mastery guide and the Reactor Energy & Tactical Assault guide cover how that investment pays off in a fight.
